Product: Guided Access
Producer: Apple
Compatibility: iOS
Price: Free (included feature on iPad/iPhone)
Product Summary
Guided Access is a built-in feature available on iPad that is designed to limit the availability of certain features (as selected by user) while accessing an app. Originally this was intended as parental controls for use when a child was accessing the device; to both prevent access to non-age appropriate content and avoid unintended purchases. This feature has since become popular for use with individuals with disabilities as support staff are able to limit the impact of accidental gestures which can quickly change settings or switch/close apps which can be disruptive and distracting to the user. This feature is also available on iPhone.
Highlights
- Once set-up, easy to initiate and end;
- Wide variety of settings that can be manipulated to suit each unique user’s needs;
- Built-in feature (no need to download external apps) and is compatible with almost all apps available on the App Store;
- Support strategy that can be used with minimal supervision and intervention (reduces verbal prompts required from support staff);
- Ideal for users with fine motor impairments, stimming behaviours, attention deficits, and for those who may be using an iPad strictly as a communication device or independent learning tool.
Lowlights
- Initial set-up takes time and requires support staff to navigate a series of menus which can be confusing;
- Must be password protected using Apple’s escalating lock-out system for each incorrect password entry (this can potentially disable a device for several hours if repeated attempts are made);
- Certain features, such as screenshot, are automatically locked out which may decrease functionality in non-preferred ways.
How To (Step-By-Step):
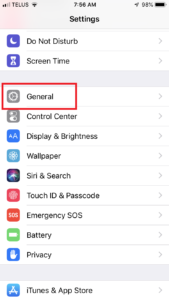
- Select <Settings> icon on iPad’s main screen. Note: the settings menu appears as two columns on iPad and a series of single screens on iPhone. The steps for set-up are the same, though the screen views may have some variation between on devices.

- Select <General> from the left menu column.
- Select <Accessibility> from the right menu column.
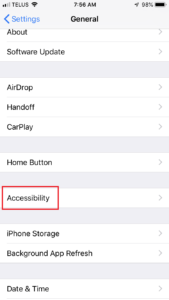
- Scroll to the bottom of the right menu column and select <Guided Access>.
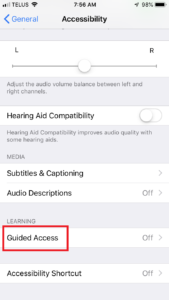
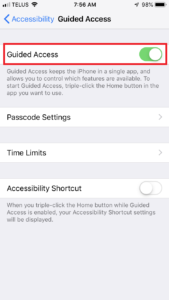
- This is the initial settings screen for Guided Access. Swipe right on the switch to turn on Guided Access and view the options. Here you can set your passcode (it will prompt you to do so upon starting the feature if you do not do so in advance) and modify notification settings for using time limits within Guided Access. To disable Guided Access when not in use, swipe left on the switch (though leaving this feature activated in the background will not impact iPad functionality).
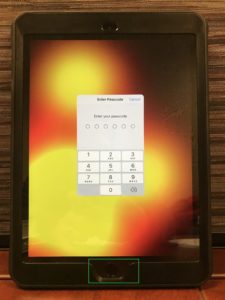
- When ready to use Guided Access within an app, select the app and allow it to load fully. Triple-click the home button (indicated in green) to initiate the Guided Access start-up screen. Here you may select what features you would like available to users and set a time limit for use.

- Select <Start> on the top right corner of the screen to initiate Guided Access. This will close the settings screen and automatically lock the view to the selected app.
- To end Guided Access or return to the settings screen, triple-click the home button and enter the password you created earlier.

- If the app is not functioning as expected, select <Hardware Buttons: Options> (indicated in blue) and ensure that the desired features are turn on/off as required for use.
- To end Guided Access, select <End> on the top left hand corner of the screen. This will close the settings screen and return to the selected app with all normal features enabled.